在Youtube上搜索!
Ledger Live 是
Ledger Wallet (formerly Ledger Live) is a comprehensive cryptocurrency management application that pairs with Ledger hardware wallets to provide secure portfolio tracking, staking, swapping, and DeFi access across 5,500+ digital assets.
Ledger Live 是一款功能强大的应用程序,旨在让用户完全控制自己的数字体验。Ledger Live 让您能够安全地管理活动,同时保护您的数据。通过将易用性与安全性相结合,Ledger Live 充当所有活动的中央枢纽。
工作原理 Ledger Live
Ledger Live 直接连接到您的账户,确保敏感数据永远不会离开设备。所有操作都需要确认,保护用户免受未经授权的访问。Ledger Live 充当界面,而安全性在每个层面都得到执行。
Ledger Live的主要功能
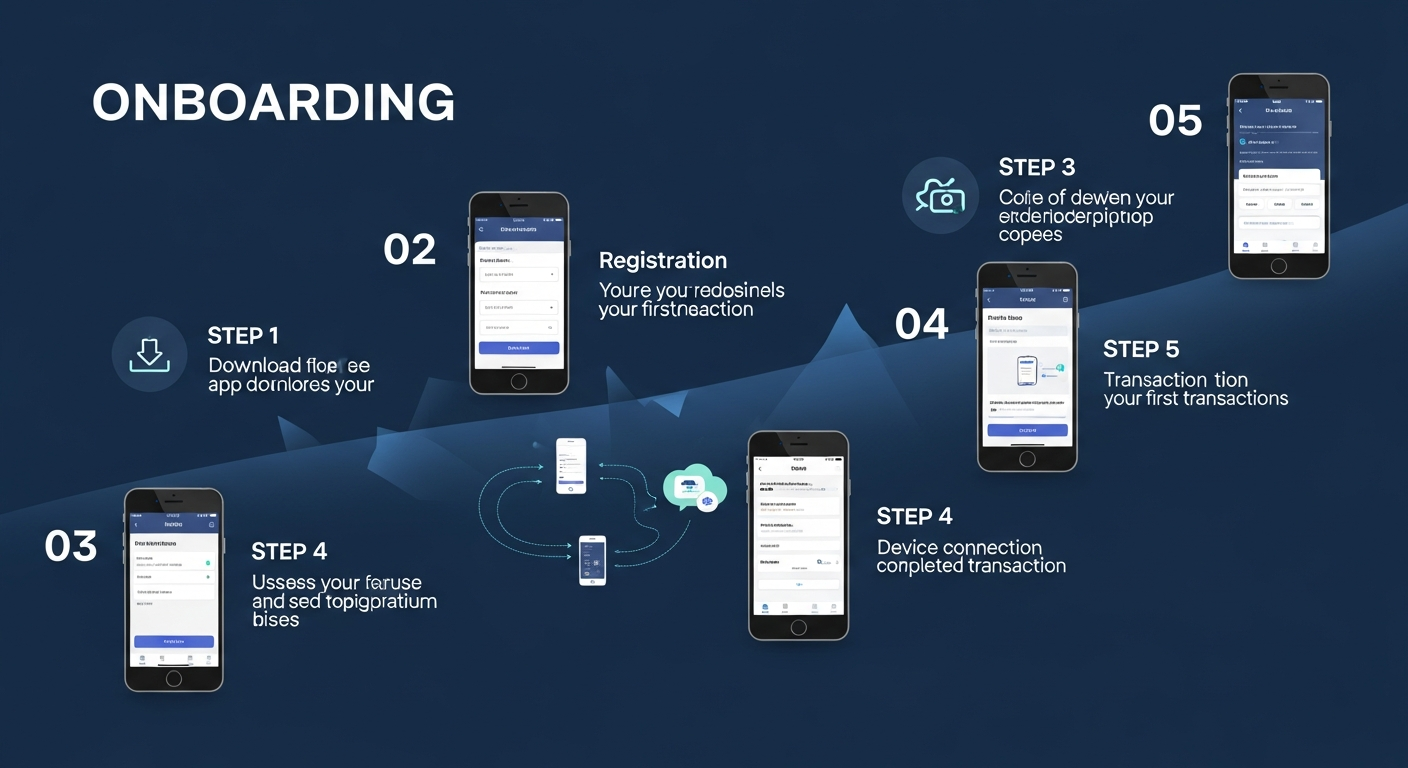
Follow these steps to set up Ledger Wallet and start managing your crypto portfolio with hardware wallet security TL;DR — Quick Setup Steps Download Ledger Wallet for desktop (Windows, macOS, Linux) or mobile (iOS, Android) Connect your Ledger hardware wallet via USB or Bluetooth and complete the pairing process Run the security checklist to verify device authenticity and update firmware Add cryptocurrency accounts for Bitcoin, Ethereum, and any other supported networks Start sending, receiving, staking, and swapping — all secured by hardware wallet signing Setting up Ledger Wallet is a straightforward process that takes approximately 15–20 minutes from download to your first transaction. This guide walks you through each step in detail, ensuring your hardware wallet is properly configured and secured before you begin managing your digital assets. If you are new to Ledger, we recommend reading our features overview first to understand what the application offers.
Ledger Live中的资产管理
The application is available for Windows 10 or later (64-bit), macOS 12 Monterey or later, Ubuntu 20.04 LTS or later, iOS 15 or later, and Android 10 or later. Always download from the official Ledger website or official app stores to avoid counterfeit applications. Install the application by following the standard installation process for your operating system.
以安全为核心
Mobile versions are available through the Apple App Store and Google Play Store respectively. When you launch Ledger Wallet for the first time, the application will guide you through an initial setup wizard. If you have a new Ledger device still in its packaging, select “Set up a new device”.
Ledger Live与自我托管
Step 2: Connect Your Ledger Device Connect your Ledger hardware wallet to your computer using the included USB cable, or pair it via Bluetooth if you are using a Nano X, Stax, or Flex with the mobile application. Ensure your device is powered on and unlocked with your PIN code before attempting to connect. Ledger Wallet will automatically detect your connected device and display its model, firmware version, and connection status.
买入、卖出和兑换
For USB connections, use only the cable provided with your device or a certified USB-C/USB-A cable. Avoid USB hubs or extension cables, as these can sometimes cause unreliable connections. For Bluetooth pairing, ensure Bluetooth is enabled on your mobile device and that your Ledger is in pairing mode (accessible through the Ledger device’s settings menu).
Ledger Live中的兑换
This step is critical for ensuring your hardware wallet has not been tampered with and is operating with the most current security patches. The security checklist performs the following checks: device authenticity verification using Ledger’s cryptographic attestation (confirming the Secure Element chip is genuine and has not been replaced or modified), firmware version check with automatic update prompts if a newer version is available, PIN code verification to confirm you have set a strong PIN, and recovery phrase backup confirmation to ensure you have properly recorded your 24-word recovery phrase. If a firmware update is available, we strongly recommend installing it before proceeding.
使用Ledger Live进行质押
The update process is guided within Ledger Wallet and typically takes 5–10 minutes to complete. Your accounts and recovery phrase are not affected by firmware updates. Step 4: Add Cryptocurrency Accounts With your device connected and security checklist complete, you can begin adding cryptocurrency accounts.
支持的质押资产
Ledger Wallet will prompt you to install the corresponding blockchain application on your Ledger device if it is not already present. Device apps are small programs that run on your hardware wallet and handle the cryptographic operations specific to each blockchain. Installing an app takes just a few seconds and does not affect your existing accounts or seed phrase.
Ledger Live和DeFi访问
You can add multiple accounts for the same network to organize your holdings — for example, separate accounts for savings, trading, and DeFi activities. Step 5: Send & Receive Cryptocurrency To receive cryptocurrency, navigate to the account you want to receive into and click “Receive”. Ledger Wallet will display your receiving address along with a QR code.
WalletConnect和DApp集成
To send cryptocurrency, click “Send” from the relevant account, enter the recipient address and the amount you wish to transfer, and review the transaction details including the network fee. When you click “Continue”, the transaction details are sent to your hardware wallet for signing. Review the recipient address, amount, and fee on your device screen using Clear Signing, then confirm by pressing the physical button or tapping the touchscreen.
Ledger Live移动端和桌面端
This hardware confirmation requirement is what makes Ledger fundamentally more secure than software wallets — even if malware on your computer modifies the displayed address, the true transaction details appear on your trusted hardware wallet screen. Step 6: Stake Your Assets Navigate to the “Earn” or “Staking” section in Ledger Wallet to begin earning rewards on your proof-of-stake assets. Select the cryptocurrency you want to stake (ETH, SOL, DOT, ATOM, etc.) and choose a staking provider from the available options.
用户体验和界面
Enter the amount you wish to stake and review the terms. For Ethereum, you can stake any amount through pooled staking providers like Lido or Kiln and receive a liquid staking token in return. For networks like Solana and Cosmos, you delegate directly to a validator of your choice.
隐私与合规
After staking, Ledger Wallet automatically tracks your accumulated rewards, displays your current APY, and provides historical earnings charts. You can unstake your assets at any time, subject to the unbonding period specific to each blockchain network (for example, Ethereum has a variable withdrawal queue, while Cosmos has a 21-day unbonding period). Step 7: Swap Crypto To swap one cryptocurrency for another, navigate to the “Swap” section in Ledger Wallet.
Ledger Live与透明度
Ledger Wallet will query multiple swap providers simultaneously and display quotes from each one, including the exchange rate, network fees, and provider fees. Compare the quotes to find the best rate for your specific trade. Rates can vary significantly between providers depending on the token pair, trade size, and current liquidity conditions.
Ledger Live的未来
The outgoing transaction is signed by your Ledger device, and the received tokens are deposited directly into your hardware wallet account. Supported swap providers include Changelly, 1inch, Paraswap, and others, with coverage spanning hundreds of token pairs across multiple blockchain networks. The entire swap process is completed within Ledger Wallet, with no need to visit external exchanges or connect your wallet to third-party websites, reducing your exposure to phishing attacks and malicious dApps.
Ledger Live在Web3生态系统中
Ledger Live利用尖端技术提供卓越性能。通过Ledger Live,用户可以访问为初学者和高级用户设计的功能。